 Cool Wind on Study
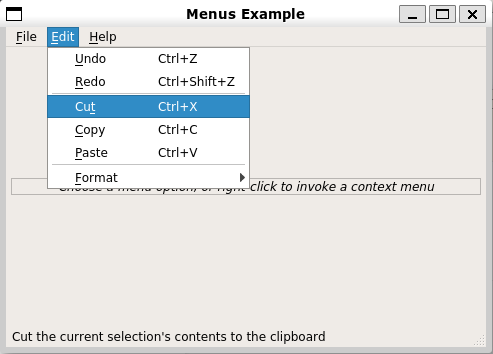
Qt Menus Example
Reference Links
- Qt Documentation - Menus Example
- Qt Documentation - Qt Widgets Examples
- Qt Source code - Menus Example
Menus Example
- How menus can be used in a main window application
- Menu widget can be either
- a pull-down menu in a menu bar or
- Pull-down menus are shown by the menu bar when the user clicks on the respective item or presses the specified shortcut key.
- a standalone context menu.
- Context menus are usually invoked by some special keyboard key or by right-clicking.
- a pull-down menu in a menu bar or
- A menu consists of a list of action items.
-In applications, many common commands can be invoked via menus, toolbar buttons as well as keyboard shortcuts.
- Since the user expects the commands to be performed in the same way, regardless of the user interface used,
- it is useful to represent each command as an action.
- Since the user expects the commands to be performed in the same way, regardless of the user interface used,
- The Menus example consists of one single class, MainWidow, derived from the QMainWindow class.
- When choosing one of the action items in our application, it will display the item’s path in its central widget.
MainWindow Class Definition
- QMainWindow class provides a main application window, with a menu bar, tool bars, dock widgets and a status bar around a large central widget.
class MainWindow : public QMainWindow
{
    Q_OBJECT

public:
    MainWindow();

protected:
#ifndef QT_NO_CONTEXTMENU
    void contextMenuEvent(QContextMenuEvent *event) override;
#endif // QT_NO_CONTEXTMENU
- In this example, we will see how to implement pull-down menus as well as a context menu.
- In order to implement a custom context menu we must reimplement QWidget’s contextMenuEvent() function to receive the context menu events for our main window.
private slots:
    void newFile();
    void open();
    void save();
    void print();
    void undo();
    void redo();
    void cut();
    void copy();
    void paste();
    void bold();
    void italic();
    void leftAlign();
    void rightAlign();
    void justify();
    void center();
    void setLineSpacing();
    void setParagraphSpacing();
    void about();
    void aboutQt();
- We must also implement a collection of private slots to respond to the user activating any of our menu entries.
- Note that these slots are left out of this documentation since they are trivial,
- i.e. most of them are only displaying the actions’s path in the main window’s central widget.
private:
    void createActions();
    void createMenus();
- simplify the constructor by implementing two private convenience functions
- to create the various actions,
- to add them to menus
- and to insert the menus into our main window’s menu bar.
    QMenu* fileMenu_;
    QMenu* editMenu_;
    QMenu* formatMenu_;
    QMenu* helpMenu_;
    QActionGroup* alignmentGroup_;
    QAction* newAct_;
    QAction* openAct_;
    QAction* saveAct_;
    QAction* printAct_;
    QAction* exitAct_;
    QAction* undoAct_;
    QAction* redoAct_;
    QAction* cutAct_;
    QAction* copyAct_;
    QAction* pasteAct_;
    QAction* boldAct_;
    QAction* italicAct_;
    QAction* leftAlignAct_;
    QAction* rightAlignAct_;
    QAction* justifyAct_;
    QAction* centerAct_;
    QAction* setLineSpacingAct_;
    QAction* setParagraphSpacingAct_;
    QAction* aboutAct_;
    QAction* aboutQtAct_;
    QLabel* infoLabel_;
- Finally, we declare the various menus and actions as well as a simple information label in the application wide scope.
- The QMenu class provides a menu widget for use in
- menu bars,
- context menus,
- and other popup menus
- while the QAction class provides an abstract UI action that can be inserted into widgets.
- In some situations it is useful to group actions together,
- e.g., we have a Left Align actions, a Right Align action, a Justify action, and a Center action, and we want only one of these actions to be active at any one time.
- One simple way of achieving this is to group the actions together in an action group using the QActionGroup class.
MainWindow Class Implementation
- In the constructor, we start off by creating a regular QWidget and make it our main window’s central widget.
- Note that the main window takes ownership of the widget pointer and deletes it at the appropriate time.
MainWindow::MainWindow() { QWidget* widget = new QWidget; setCentralWidget(widget); QWidget* topFiller = new QWidget; topFiller->setSizePolicy(QSizePolicy::Expanding, QSizePolicy::Expanding); infoLabel_ = new QLabel(tr("<i>Choose a menu option, or right-click to " "invoke a context menu</i>")); infoLabel_->setFrameStyle(QFrame::StyledPanel | QFrame::Sunken); infoLabel_->setAlignment(Qt::AlignCenter); QWidget* bottomFiller = new QWidget; bottomFiller->setSizePolicy(QSizePolicy::Expanding, QSizePolicy::Expanding); QVBoxLayout* layout = new QVBoxLayout; layout->setContentsMargins(5, 5, 5, 5); layout->addWidget(topFiller); layout->addWidget(infoLabel_); layout->addWidget(bottomFiller); widget->setLayout(layout); - Then we create the information label as well as a top and bottom filler that we add to a layout which we install on the central widget.
-
QMainWindow objects come with their own customized layout
- Followings are considered as errors.
- setting a layout on a the actual main window,
- or creating a layout with a main window as a parent
- You should always set your own layout on the central widget instead.
- Followings are considered as errors.
    createActions();
    createMenus();

    QString message = tr("A context menu is available by right-clicking");
    statusBar()->showMessage(message);

    setWindowTitle("Menus Example");
    setMinimumSize(160, 160);
    resize(480, 320);
}
-
QMainWindow’s statusBar(){target=”_blank”} function returns the status bar for the main window (if the status bar does not exist, this function will create and return an empty status bar).
- We initialize the status bar and window title, resize the window to an appropriate size as well as ensure that the main window cannot be resized to a smaller size than the given one.
void MainWindow::createActions()
{
    newAct_ = new QAction(tr("&New"), this);
    newAct_->setShortcuts(QKeySequence::New);
    newAct_->setStatusTip(tr("Create a new file"));
    connect(newAct_, &QAction::triggered, this, &MainWindow::newFile);
    ...
    ...
- A QAction object may contain
- an icon,
- a text,
- a shortcut,
- a status tip,
- a “What’s this?” text,
- and a tooltip.
-
Most of these can be set in the constructor, but they can also be set independently using the provided convenience functions.
- In the createActions() function,
- we first create a newAct action.
- We make Ctrl+N its shortcut using the QAction::setShortcut() function,
- and we set its status tip using QAction::setStatusTip() function (the status tip is displayed on all status bars provided by the actions’s top-level parent widget).
- We also connect its triggered() signal to the newFile() slot.
- we first create a newAct action.
- The rest of the actions are created in a similar manner.
    alignmentGroup_ = new QActionGroup(this);
    alignmentGroup_->addAction(leftAlignAct_);
    alignmentGroup_->addAction(rightAlignAct_);
    alignmentGroup_->addAction(justifyAct_);
    alignmentGroup_->addAction(centerAct_);
    leftAlignAct_->setCheckable(true);
}
-
Once we have created the Left Align, Right Align, Justify, and a Center actions, we can also create the previously mentioned action group.
- Each action is added to the group using QActionGroup’s addAction() function.
- Note that an action also can be added to a group by creating it with the group as its parent.
- Since an action group is exclusive by default, only one of the actions in the group is checked at any one time
- (this can be altered using the QActionGroup::setExclusive() function).
- Since an action group is exclusive by default, only one of the actions in the group is checked at any one time
- Note that an action also can be added to a group by creating it with the group as its parent.
- When all the actions are created, we use the createMenus() function to add the actions to the menus and to insert the menus into the menu bar:
void MainWindow::createMenus()
{
    fileMenu_ = menuBar()->addMenu(tr("&File"));
    fileMenu_->addAction(newAct_);
    fileMenu_->addAction(openAct_);
    fileMenu_->addAction(saveAct_);
    fileMenu_->addAction(printAct_);
    fileMenu_->addSeparator();
    fileMenu_->addAction(exitAct_);

    editMenu_ = menuBar()->addMenu(tr("&Edit"));
    editMenu_->addAction(undoAct_);
    editMenu_->addAction(redoAct_);
    editMenu_->addSeparator();
    editMenu_->addAction(cutAct_);
    editMenu_->addAction(copyAct_);
    editMenu_->addAction(pasteAct_);
    editMenu_->addSeparator();
-
QMenuBar’s addMenu() function appends a new QMenu with the given title, to the menu bar
- (note that the menu bar takes ownership of the menu).
- We use QWidget’s addAction() function to add each action to the corresponding menu.
- Alternatively, the QMenu class provides several addAction() convenience functions that create and add new actions from given texts and/or icons.
- You can also provide a member that will automatically connect to
- the new action’s triggered() signal,
- and a shortcut represented by a QKeySequence instance.
- You can also provide a member that will automatically connect to
- Alternatively, the QMenu class provides several addAction() convenience functions that create and add new actions from given texts and/or icons.
- The QMenu::addSeparator() function creates and returns a new separator action,
- i.e. an action for which QMenu::isSeparator() returns true,
- and adds the new action to the menu’s list of actions.
    formatMenu_ = editMenu_->addMenu(tr("&Format"));
    formatMenu_->addAction(boldAct_);
    formatMenu_->addAction(italicAct_);
    formatMenu_->addSeparator()->setText(tr("Alignment"));
    formatMenu_->addAction(leftAlignAct_);
    formatMenu_->addAction(rightAlignAct_);
    formatMenu_->addAction(justifyAct_);
    formatMenu_->addAction(centerAct_);
    formatMenu_->addSeparator();
    formatMenu_->addAction(setLineSpacingAct_);
    formatMenu_->addAction(setParagraphSpacingAct_);
- Note the Format menu
- It is added as a submenu to the Edit Menu using QMenu’s addMenu function.
- Take a look at the alignment actions: In the createActions() function we added the leftAlignAct, rightAlignAct, justifyAct and centerAct actions to an action group.
- Nevertheless, we must add each action to the menu separately while the action group does its magic behind the scene.
#ifndef QT_NO_CONTEXTMENU
void MainWindow::contextMenuEvent(QContextMenuEvent* event)
{
    QMenu menu(this);
    menu.addAction(cutAct_);
    menu.addAction(copyAct_);
    menu.addAction(pasteAct_);
    menu.exec(event->globalPos());
}
#endif	// QT_NO_CONTEXTMENU
- To provide a custom context menu, we must reimplement QWidget’s contextMenuEvent() function to receive the widget’s context menu events.
- Whenever we receive such an event, we create a menu containing the Cut, Copy and Paste actions,
- By passing the event’s position as argument, we ensure that the context menu appears at the expected position.